Hot Mulled Cider recipe – A holiday fave to share & enjoy

Sharing our Hot Mulled Spice Recipe

apple-mulling-spices-etc-at-the-shop-wfs-fbIngredients

  • 16 cups pure apple juice or fresh apple cider
  • 4 (2-inch) cinnamon sticks
  • 6 fresh or dehydrated orange, lemon, apple, or pear slices
  • Add cranberries if desired
  • 6 whole cloves
  • 2 star anise
  • 6 cardamom pods
  • dozen fennel seeds
  • just a pinch of nutmeg
  • dozen tellicherry peppercorn
  • tablespoon of ginger root

Directions

dried-orange-slices-at-wfs-and-air-plant-fbCombine all the ingredients in a saucepan and simmer over low heat for at least 20 minutes.  The juice, (wine or cider) needs time to absorb all of the flavours from these lovely ingredients.

Don’t let it heat up so much that it boils. You’ll know when it’s ready because your kitchen will smell so good!

You can wrap the ingredients in a cheese cloth bag too,  which makes for easier clean up, and less ‘floaties’ in the cup!

Pour into mugs, garnish with a sprig of mint if desired.

Time: 20 min – Prep: 10 min – Yield: 12 + servings  Level: Easy

Alternatively, we offer Mulled Spice Kits at our Etsy shop: HERE – Cheers!

← Back

Thank you for your response. ✨

We’re offering #free #shipping with a $75 purchase at our #Etsy shop. ‘Tis the season! :)

gentlemens-gift-crate

Use code: FREESHIP75 coupon offer for free shipping on all orders in our Etsy shop over $75.00, in Canada and the U.S.

– Available until Dec. 9th.

lavender-themed-gift-basket-at-wfs


This discount is applied at check-out.

Simply type the promo code into the box marked coupon, and the offer will be applied to your order.

Thank you, and Happy Holidays!

gin-and-bitters-diy-kit-gifts-at-wall-flower-studio-blog


Wall Flower Studio business logo square

← Back

Thank you for your response. ✨

How to grow, pollinate and harvest seeds from an amaryllis – It’s very easy!

amaryllis-vittata-february-2015pistil-and-stigma-for-pollinating-the-amaryllis-karen-sloanPollinating and saving seeds from Amaryllis is very simple. All you need is a light touch.

Step 1: Collect some pollen, (gently), on your finger from the stamen. (see next photo)
Step 2: Dust it lightly on the stigma.
This should be done when the stigma (Pistil) is completely open.

Just a note: Some people use a paint brush to transfer the pollen, but this is not a requirement if you’re very gentle.

I don’t pollinate any flower with its own pollen. I’ll use the pollen from one flower to pollinate another .
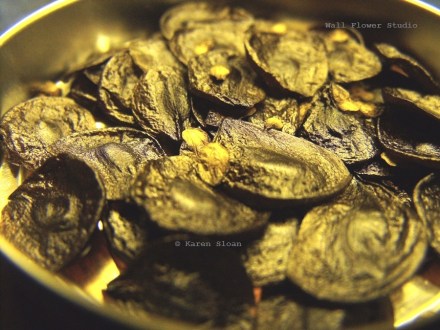
seed-pod-developing-on-the-amaryllis-karen-sloan-wall-flower-studio

Unripe seed pod

This is a seed pod that develops not long after, from the pollinated flower that dies back.

Let it mature and turn brown. Then the seed head is ready to harvest.

amaryllis-seed-pod-opening-copyright-karen-sloan-wall-flower-studio

Seed pod is ready to harvest.


Many people ask me how to bring an Amaryllis  into bloom again…  Here’s my advice:

Don’t dig up your bulbs and stick them in the closet in the fall.  Don’t do it. It doesn’t happen that way in nature!

Why anyone started promoting such fiction, I’ll never know.

Seriously, I can’t tell you how much this myth irritates me, and every year I see gardening articles perpetuating this falsehood, repeating it verbatim like parrots, likely by writers who haven’t actually accomplished what they’re proposing you to do..

Because of that, it’s no wonder so many people tell me they’ve given up growing these beauties and can’t get a bulb to re-flower the next year. Purely because something so simple has been made to seem so very complicated…. There’s my rant for today!

amaryllis-seeds-karen-sloan-wall-flower-studio

Freshly harvested, plump amaryllis seeds

In any case, bulbs have an internal clock that works very well, with or without our help.

As long as the flower stalks are allowed to die back naturally after flowering, and there has been sufficient water, light and food over the course of the year, (I only give them a bit of very diluted coffee or tea once a month), then you have the secret to getting them to flower again.

amaryllis-wfsMy amaryllis is 130 years old.

It was my originally my great-great grandmother’s plant, a true heirloom, and I cherish it!

It blooms every year, and sometimes twice. I can tell you, it has NEVER seen the inside of a closet!

Treat it as you would any houseplant, all year long, but ease up on the watering in November.

Don’t let your plant completely dry out, but water it once per month until a flower bud starts to emerge. Then water every 10 days or so. After the flowers finish, let the stalks die back naturally. This is very important as this is what provides the bulb with the energy to produce a flower next year… 

If you don’t like the look of the plant while it’s in this semi-dormant state, put it in a room where it’s not so visible.

Leaves will die back too, and watering should be lessened again ‘til  mid March when the sun gets higher in the sky, and you’ll see an abundance of new foliage. Water more often, as the cycle has begun again.


We’re on the #BlackFriday bandwagon…

Black Friday

Black Friday

 In honour of  #BlackFriday,  #SmallBizSaturday,  & #CyberMonday, we’re offering a 20% online order discount coupon code to enter at time of purchase:

WFSBF20

This Friday is the perfect time to take advantage of  savings, right here at our Etsy shop 🙂

We ship world wide!

For more information, visit our latest online newsletter.

Thank you!


Sharing a couple of our customer favourites!

calendula-balm-wfs

Calendula and Rose hip balm


DIY Gin Kit at Wall Flower Studio


DIY Gin Kit


← Back

Thank you for your response. ✨

Wall Flower Studio business logo square

The unusual Rose of Jericho, aka Resurrection plant, (or even) Zombie plant?!

ressurection-plants-at-wall-flower-studioSharing an unusual North American native plant today, (not from my neck of the woods!), but from Arizona and Texas.  The Selaginella lepidophylla, otherwise known as a rose of Jericho, or resurrection plant, is about as drought tolerant a plant as you can get. It is actually classed as a tumbleweed and this seemingly innocuous species is simply amazing! Let me explain why..

Doesn’t look like much, does it?! A dead root ball, perhaps.. However, mist it with some water, stand back and watch the magic begin as it comes back to life.

Back from the dead, as its name suggests! From a dead ball of brown to a thriving green plant with cedar like ferny foliage, and all in about an hour’s time! Considering the time of year with Halloween approaching, perhaps ‘zombie plant’ wouldn’t be far off, after all. 😉

resurrection-plant-opening-wfs-2016-011I’ve taken a series of photos to show the progress from the above photo to green and alive! It turns green pretty quickly.

This was about 10 minutes after watering.


It starts to unfurl… 15 minutes in.

resurrection-plant-opening-wfs-2016-012

more unfurling.. 20 minutes in.

resurrection-plant-opening-wfs-2016-013


resurrection-plant-opening-wfs-2016-015

The green colour is much more apparent at this point. Deepening to a cedar green colour… 45 minutes in.


Almost all the way open! 55 minutes in.

resurrection-plant-opening-wfs-2016-017


resurrection-plant-opening-wfs-2016-019

Filling out nicely and the green is soft and lush. 65 minutes in.


resurrection-plant-opening-wfs-2016-021Fully open! Looks kind of like a big ferny, mossy chrysanthemum blossom!

Smells like a forest after the rain.

The best part is, you can let it dry right out again. It will return to its natural dried state,  furled up like an animal in a deep winter hibernation, waiting for spring to arrive once again.

For more information on these lovely and unusual plants, visit:

Thank you for visiting!

Wall Flower Studio business logo square